Timesheets - View, Add and Edit My Timesheet (view, add and edit your own timesheet entries); Timesheets - View, Add and Edit All Timesheets (view, add and edit timesheet entries for all staff members)
If you are expected to enter timesheets, we recommend you do this on a daily basis and monitor your incomplete timesheets on the dashboard.
If you use timers, you can create timesheet entries from the timer button located on the top menu or the Timers tab on the My Timesheet page.
- Access the My Timesheet page.
- Click Change User to enter time on behalf of another user, if applicable.
- Select the user from the list and click Change.
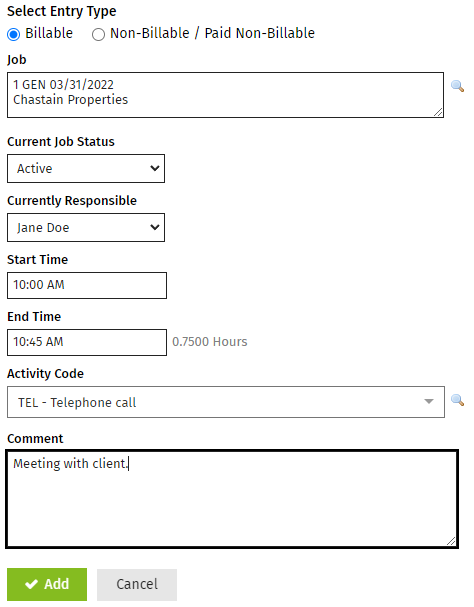
- Select the entry type to specify the type of entry you are making (Billable or Non-billable/Paid Non-billable).
- If entering billable time, type the first few letters of the client name in the Job field, then select the required job from the drop-down list OR click the Search button
 to locate and select the required job. Then, change the job status and the person currently responsible for the job, if applicable.
 - Use EITHER of these methods to enter time, depending on whether you are using actual time or units:
- You can enter hours in the 24 hour format. CCH iFirm will automatically assign the AM or PM indicator. For example, if you enter "13", CCH iFirm will set the times as 1:00 PM. Similarly, if you enter "1", CCH iFirm will set the times as 1:00 AM.
- If you manually enter AM or PM along with the time, CCH iFirm will accept this. For example, if you enter "1 PM", CCH iFirm will set 1:00 PM as the time.
- If you are using units, select the quantity of units in the field provided.
- Specify the activity worked on for the job using EITHER of these methods:
- Enter the first few letters of the activity code in the field provided, then select the required code from the drop-down list.
- Click the Search button
 beside the Activity Code field to locate and select the required code.
 - Enter a note about the work completed in the Comment field, if required.
- Click Add - your entry displays on the right, including the dollar values and chargeout rates. Once you've added an entry you can click the Job ID number to return to the Job Details screen or the client name to open the client profile.
